Monday, August 6, 2012
Wire Sculpture
Saturday, May 21, 2011
Saturday, May 14, 2011
Instructions
You will need:
• Thread
• Cardboard
• Pens
• Scissors
What You Do
1. Draw an odd number on the outside of the card board
2. Cut through the middle of the number about this much ------
3. Weave one to 11 or 9
4. Weave over and under until you get back to the start
5. Tie a knot around the next string
6. Weave another colour and once you have done all the weaving you can start to colour your place mat as a pattern
Instructions

Materials:
Scissors
Sellotape
Wool
Plastic cup
What you do:
1.Cut slits down into the cup make sure you either cut 9 or 11 slits.
2.Tape your first choice of wool to the bottom of the cup.
3.weave over under over under until finished the colour.
4.Tie on the next colour to the end of the wool contuine to weave until you’ve woven around the entire cup.
Thursday, February 24, 2011
Artwork
Monday, March 8, 2010
Picasso Faces


We looked at Pablo Picasso's work last week. We especially looked at his portraits and his cubist work. This influenced and inspired us in our creations using pastels and Indian ink Click on the picture of Picasso and check out Mykidsart. It has some information about Picasso and examples of his work. Here are some photos of our artists at work.
Below is a graphic for a great website where you can create your own Picasso. It's called Mr. Picassohead. Have fun.


Wednesday, October 28, 2009
Tuesday, September 22, 2009
Weaving & Winding
We are doing paper plate weaving as part of our visual art.Here is what we did...
1. Decided on the shape e.g. fan, concentric, circles, stripes etc
2. Cut notches in the plates in appropriate places and wound the warp threads with wool.
3. Chose our fabric strips for the weft, and wove them in and out to get the right shape. Tucked or glued the odd ends into the back of the work, and trimmed the edges.
4. Used beads, sequins,feathers, foil as decoration.

Looms can be made from many things. They may be commercially bought, circular or square notched looms, or may be home-made from a shoebox lid or plastic ice-cream lid. They may be made from notched paper plates or curved pieces of card. You could weave on a forked twig, a bicycle wheel, a wire coat hanger, a refrigerator shelf, a bent piece of copper pipe, a clothes horse or the upturned legs of a chair. The only criterion is that the warp threats are held taut.
Wednesday, April 29, 2009
Portraits
Tuesday, April 28, 2009
Sculptures At Rippon
This morning we visited Rippon Vineyard to view an exciting exhibition. We completed a booklet based around all exhibits. At each sculpture we had to respond using our senses. We learnt that we all respond to art in different and similar ways. We wrote and drew our responses.
Sketching Skills


Shenee loved sketching! She did so well. We were all proud of her.
Saturday, April 25, 2009
Sketching
Thursday, March 5, 2009
Tuesday, March 3, 2009
Spiders


Today we created a new species of spider. We used paper tearing techniques rather than cutting. These murals are going to be displayed at the Wanaka A & P Show on the 13th and 14th March
Thursday, February 26, 2009
Picasso Portraits
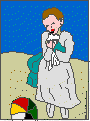
Pablo Picasso was a Spanish artist who revolutionized painting, drawing, sculpture, and ceramics. He truly changed the way people think about Art.Learn more about Picasso by clicking on the painting of 'Child with a Dove'1901
Picasso once said...
"All children are artists. The problem is how to remain an artist once we grow up." Quote from Pablo Picasso

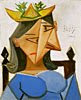
Click on the portrait to visit Mr Picasso Head and create your own Picasso portrait and add to the gallery
We used works like this one to provide us with ideas and inspiration
This is another of Picasso's paintings called 'Girl in a Mirror'
Here are some of our creative questions...1. What style does he use? Why do you think he uses the colors he does?
2. How could he rearrange the faces to look interesting or silly?
3. Do you see any sort of pattern that he seems to use in his paintings?
4. Why do you think Picasso chose to represent his figures in this manner?
For our first lessons we used a pencil to do lots of sketches of faces. We had to sketch looking at the person for 35, 30, 25, 20 seconds at a time. We had to look at the face rather than the paper and try to not lift our pencil. This was really hard but we got better with each practise session.
We then used chalk to draw the face profiles starting in the middle of the page. The next step was to draw the other face so that there are two faces. We went over these chalk lines with black pastel. Next we drew in the forehead, mouth and chin, leaving the neck till later. On the face we drew an eye facing towards us The mouth is where we joined the two faces. This was also where we saw how the two faces fitted together. We drew hair, neck and shoulders.
Then the fun part started. We began using pastels to colour one side of the face with one colour then chose a different color for the other side. We learnt to layer pastel and colour with a light pastel then cover with a dark pastel.
We found out that the oil pastel should be applied heavily. We also found out that with heavy pastel it is easy to scratch off the top layer later on,
Once the entire page is coloured, For the final step we used black Indian ink to go over the black lines again and to add eye lashes and other smaller features we wanted to stand out.
Here are some photos of one of our session. We will show you our artworks next week.